on
Developers guide for building a dWebsite in Ethereum testnet
This is developers guide for building dWebsites in testnet. It follows an example of making a dWebsite, tutorial.eth in Rinkeby testnet.
The guide is comprehensive, trying to fill in all aspects of making a testnet dWebsites. We divided it into many subsections, so you can easily read only the topics relevant to you.
Note: testnet dWebsites are not safe! They may be deleted, modified, or removed. When you buy a testnet name there is no guarantee this name will be there the following day. Testnet dWebsites are meant for developers to test their products before putting it on the “real” Ethereum.
Prerequisites: Almonit Browser Extension
You will need the latest version Almonit Browser Extension to complete this guide. It includes testnet dWesbites support.
Install it either versions for Firefox or for Chromium-based browsers, like Chrome, Brave, Opera etc.
Choosing an Ethereum testnet
Currently, our browser extension supports ENS in two Ethereum testnets, Ropsten, and Rinkeby. What’s the difference between them?
Ropsten is an unsecured proof-of-work (PoW) blockchain. Since Ropsten is PoW, just like Ethereum’s mainnet, Ropsten simulates the bests how dApps behave in Ethereum. However, Ropsten is relatively slow (block time 30 seconds, compared to 15 seconds of Rinkey), exposed to spamming attack (where someone spams the blockchains with many transactions, making it impossible for anyone else to you), while not being eco-friendly.
Rinkeby is a proof-of-authority (PoA) blockchain, meaning it’s being operated by a small known group of trusted entities. PoA blockchains are both very eco-friendly and immune to spamming attacks. However, they simulate Ethereum less accurately, and to get tokens for them you need to use social media (brrrr).
You can find here excellent detailed analysis of the differences between all the testnets.
ENS is also deployed on Goerli testnet. However, Goerli is not supported by the current version of Almonit browser extension so we don’t dwell on it here.
How to get testnet tokens?
First, switch your wallet to testnet. In Metamask, for example, it’s done a select box in the wallet popup.
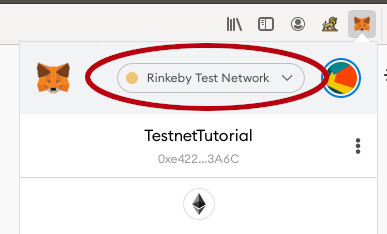
We recommend creating a new account only for testnet. Don’t use the same accounts for mainnet and testnet activities, as it’s an invitation for crucial accidents.
Getting testnet tokens depends on which testnet you use.
-
Ropsten. Super easy! Go to a Ropsten faucet, enter your Ropsten wallet address, and click ‘Send me test Ether’. That’s all!
-
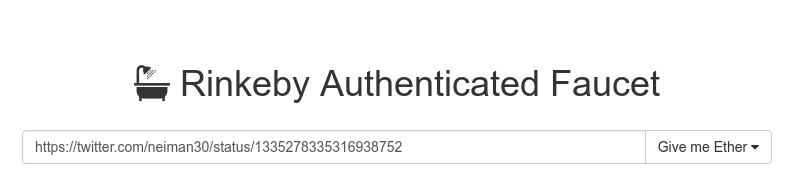
Rinkeby. We use a Rinkey faucet. The process has two steps, meant to protect Rinkeby from spamming attacks.
Step 1: Make a Twitter or Facebook post with your account address.
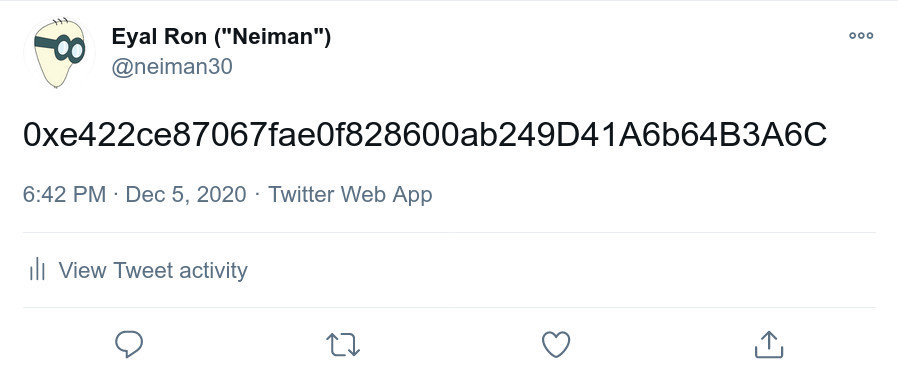
Step 2: Paste the URL of your post into the faucet.
Buy ENS name in testnet
Once you have testnet tokens, you can buy an ENS testnet name! We demonstrate the process on Rinkeby testnet, though it’s identical for all of them.
-
Switch your wallet to the testnet you’re buying a name in (see the previous section for how it’s done in Metamask).
-
Go to the ENS app. Verify, at the upper left corner of the app, that it works in the correct testnet.
-
Enter the name you want to buy and press search. You can choose between a
.ethor a.test. The difference is in the purchase process. A.ethname imitates the purchase process of mainnet ENS names, and hence is a bit slow. a.testname is much faster to buy.Note: at the time of writing this post
.testnames don’t work in testnet. However, we leave it here for the instructions to be valid once ENS fix this. -
Press
Register, and follow the instructions till you obtain the name.
Congratulations! You just bought an ENS name in testnet!
Create your first testenet dWebsite
- In ENS App, go to the manage screen of the name you bought in the previous step.
- Press ‘add/edit record’
- Insert an IPFS CID of a dWebsite in the content field. For example, this CID would give you a cool ‘ALmonit Tutorial’ dWebsite:
ipfs://QmTXWx6pLwYoX3HUGxyM7qCR3qF9MdtRMcC3fx8qnnUHU2 - Press ‘Confirm’ and confirm the transaction in your wallet.
Browse to your dWebsite
First, enable testnet support in Almonit Browser extension using those steps.
-
In the Almonit popup in yoru browser, press the settings button:

-
In the general tab, enable the checkbox of ‘Enable ENS testnet Dwebsites’, and select the testnet you want to use.
Now you can surf to your website!
You can’t simply enter the name of your testnet dWebsite, because .test and .eth are already reserved for real DNS and real ENS websites.
Instead, you need to replace .test in your name with .teth, and .eth with .testeth.
So, if we made a testnet dWebsite tutorial.test, you’ll have to type http://tutorial.teth in your address bar to access it. Or, if we made a test dWebsite tutorial.eth, you could access it by typing in the address bar http://tutorial.testeth.